| |
Using Philip
Revision history
 | March
5, 2004: Added notes about using other drives. |
| August
31, 2000: First version. |
What is it?
Philip is a program that fills up your hard drive. It was
written by Josh Mayfield and is
available at Inky’s Linkies.
Why would I want to do that?
There are three reasons.
| Philip
was initially designed to work around a problem that sometimes occurs on
computers that have very large hard drives. Some setup programs aren’t
capable of calculating space requirements on hard drives that have a very
large amount of free disk space available, because the numbers that the
computer reports are so big that they exceed the setup program’s ability
to properly interpret them. You can usually successfully install programs
like this when the hard drive has less than 2 to 4 gigabytes (or 2048 to
4096 megabytes) free. You can use Philip to temporarily stuff your hard
drive so that you can install that problematic piece of software and then
reclaim the space when you’re done. |
| Another
way that Philip comes in handy is during the development of software. With
Philip you can test how a program behaves when running on systems with very
limited free disk space. |
| If
you’re concerned about data security, you should know that when you delete
a file and empty your recycle bin in Windows, it’s not truly gone until
the sectors where it was stored get overwritten with other data. If you’re
preparing to get rid of a computer and you’re worried about future users
of it (or your hard drive) being able to retrieve old personal files from
it, you can use Philip to ensure that none of your personal data is left
over on the drive. To do this, delete all your personal files and empty your
recycle bin. Next, run Philip and tell it to leave 0MB free on your drive.
Philip will create a giant file of nonsense information that will wipe out
all traces of the old files. Finally, delete Philip’s temporary file and
reformat your drive. Good as new! |
Why not just copy a bunch of files to my drive instead?
| Speed.
It can take a long time to copy 4096 MB of files to a hard drive- sometimes
hours, depending on the source, number, and size of the files. Philip is
optimized for speed and can usually do the trick in just a few minutes. |
| Precision.
Using the file-copy method makes it tough to achieve an exact amount of free
disk space. In Philip, you just enter the number of megabytes you want free
and it calculates exactly how large its temporary file needs to be. |
| Simplicity.
Instead of searching for files and looking for an appropriate place to put
them, Philip creates a single file in your computer’s temp directory that
you can append or delete with a single click. |
What’s this do?
When you start Philip, you’ll see something like this. A
description of the controls follows:
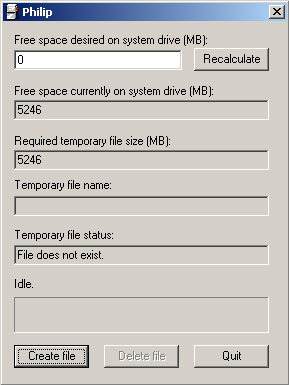
| Free
space desired on system drive (MB). Here is where you type how many
megabytes you want Philip to leave free. (Philip will fill up the rest.) For
example, if you wanted to leave 2 gigabytes free, you’d type 2048 here,
since 1 gigabyte is 1024 megabytes in size.
Note
If you’re dealing with a program that won’t work if you have more than
2GB free space, I recommend entering a bit LESS than 2048 megs here, because
your free space can be pretty dynamic- if you end up with even one BYTE more
than 2 gigabytes, those programs will break. Try something safer like 1536. |
| Recalculate.
Click this to make Philip calculate how big of a temporary file would be
required to leave your specified amount of free space on the drive. (Note:
When you click Create file Philip automatically recalculates before creating
or appending the file.) |
| Free
space currently on system drive (MB). This is how much space Philip
detects is free on the drive. In the screenshot shown here, it reports 5246
megabytes free, which is around 5.1 gigabytes. |
| Required
temporary file size (MB). This shows the number of megabytes the
temporary file would have to be to leave your desired amount of free space.
Click Recalculate if you change your free space amount. |
| Temporary
file name. This is the path and filename Philip will use for the
temporary file it creates. If Philip has never created a temporary file,
this field will be left blank; Philip will generate the name when you
attempt to create the file. |
| Temporary
file status. This indicates whether or not the temporary file currently
exists on your system. |
| Status
bar. When Philip is not doing anything, this reads Idle. When Philip is
creating or appending the file, it says Working and a progress bar indicates
how far along the process has gone. |
| Create
file. If no temporary file is on your system, this button reads Create
file, and you click it to generate the file. If the file already exists, the
button reads Append file, and when you click it Philip will increase
the file’s size until it reaches your desired amount of free space. While
Philip is working (either in Create or Append mode) this button reads Cancel
and you can click it to stop Philip at any time. |
| Delete
file. Click this to delete the temporary file and reclaim your free disk
space. |
| Quit.
Well, just click this when you’re done! |
How do I use it?
Creating a temporary file
To create a temporary file in Philip, enter the number of
megabytes that you want to have free under Free space desired on system drive
and then click Create file. (Note that one gigabyte is 1024 megabytes.)
The first time you run Philip, the default value under Free space desired on
system drive is 0, meaning it will assume that it will completely
fill the drive. The next time you run Philip, it will remember the last target
value you entered.
While Philip generates the file, it updates the progress
bar and flashes the message “Working…”. You can click Cancel
to stop the process at any time.
Note
After the temporary file is created, the Create file changes to read Append
file, and the message under Temporary file status reads: File does not
exist
Appending the temporary file
If you have already created a temporary file with Philip,
you can extend it by entering a new target value and clicking Append file.
Deleting the temporary file
Once a temporary file is created, you can delete it by
clicking Delete file. You can also delete the file manually. Its path and
file name are listed under Temporary file name.
Estimating the size of a temporary file
You can see how large a temporary file would have to be to
reach your target value by entering the value under Free space desired on
system drive and clicking Recalculate. Philip will automatically
recalculate the size it needs when you click Create file or Append
file.
Note
If your temporary file already exists and you alter your target value, the size
reported under Required temporary file size will really indicate the additional
number of megabytes that Philip will have to append to the file in order to
reach the target value- in this case it is not an indication of the temporary
file’s current or projected total size.
Troubleshooting
I just used Philip to fill up my drive, and it seemed to work, but Windows
says there’s more free space on my drive than Philip reported.
By default, Windows uses a dynamic paging file for virtual
memory. This file can grow and shrink by megabytes at a time depending on the
number and type of programs you run during a Windows session. Sometimes Windows
optimizes the paging file when disk space gets low to free up more room on your
drive.
If this happens to you, run Philip again and click Append
file to claim the extra space that Windows freed. Be aware that Windows
might shrink the paging file even more after you do this.
A more exact method of obtaining a certain amount of free
disk space is to change your computer’s virtual memory settings so it uses a
fixed-size file instead of a dynamically-sized one. These instructions are for
Windows 98 SE, and should be similar for all Windows 9x derivatives:
- On
your desktop, right-click My Computer and click Properties.
- On
the Performance tab, click Virtual Memory.
- Under
Virtual memory, select Let me specify my own virtual memory
settings.
- Enter
the same number next to Minimum and Maximum. You probably
shouldn’t enter anything less than 64MB.
- Click
OK, then Yes, then Close, then Yes to restart
your computer.
Why is Philip necessary if I can just set up a fixed-size paging file?
Because that probably won’t work. Using the steps
described earlier, you can indeed create a paging file of a fixed, exact size.
However, this only works for relatively small paging files. Windows prevents you
from creating a very large one. For example, on a computer that has 2083
megabytes free, specifying a paging file size of 2080 megabytes yields a file
that is only 28 megabytes after the computer is restarted. Windows, apparently,
believes it knows what you need better than you do.
What if I have more than one hard drive or partition?
Philip was designed to fill up your system drive (the drive
or partition where Windows is installed). There is a workaround, though, if you
have more than one partition and the one you need to fill up is not your system
drive. Here’s how to do it:
- Run
Philip and exit it at least once. You don’t have to do anything, just run
it and click Quit. This will
create a file in your Windows folder (usually C:\Windows) called Philip.ini.
- Locate
Philip.ini in your Windows folder and open it in a text editor, like
Notepad. If you have used Philip to create a temporary file before, you will
see a TempFileName line like in
the following sample file:
[Settings]
TempFileName=C:\DOCUME~1\jlmayfie\LOCALS~1\Temp\Phi5.tmp
DesiredFree=10907
- If
such a line already exists, you might want to run Philip once more and check
whether the file still exists (see the Temporary file status line). If it does, click Delete
File to get rid of the file now. Otherwise, you should note down the
file path listed here so you can manually delete that file later on if you
ever need to. If the line doesn’t already exist continue to the next step.
- Either
create the TempFileName line if
it doesn’t exist or edit the existing one so it now specifies a new file
on the desired drive. For example, if I wanted to fill up my D: drive, I’d
add a line like this:
TempFileName=D:\PhilFile.tmp
- Note
that there can only be one TempFileName
entry and it must appear under the [Settings]
line in Philip.ini. Save your changes and close the file. Also, any folders
you specify in the TempFileName
path must exist before you run Philip again. For example, if the path is D:\MyFolder\Philip.tmp,
the folder named MyFolder must already exist on drive D:.
- The
next time you run Philip, the disk space calculations it does will be based
on the drive you specified in Philip.ini, and the temporary file it creates
will be there, too.
|